James Melville Balfour's Experimental Concrete Breakwater at Timaru (1869–1870)
A Comprehensive Historical Account with Cross-Referenced Sources
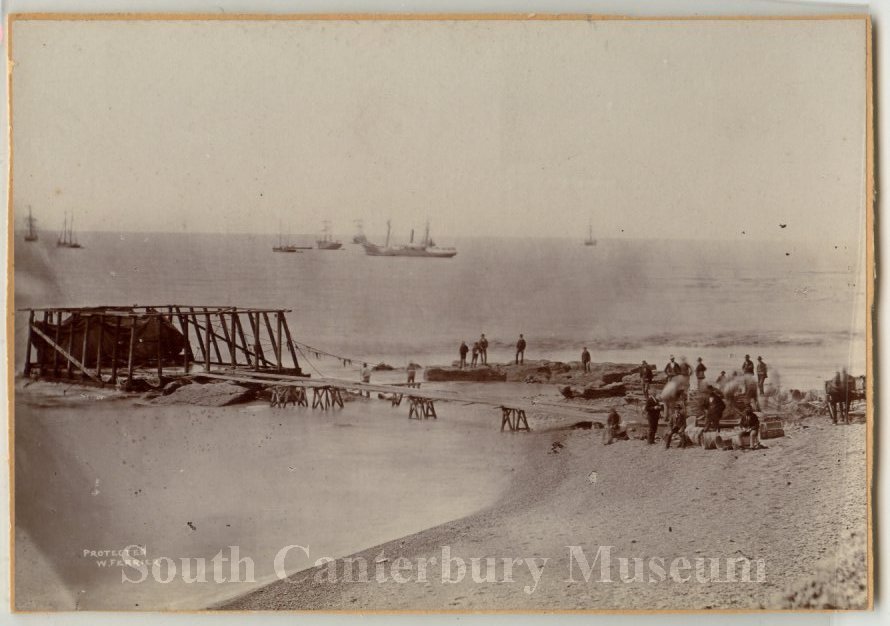
Construction Work on Timaru Reef, circa 1869–1870
This rare historical photograph, likely shows construction of James Melville Balfour's experimental concrete breakwater. The image captures the labour-intensive process of New Zealand's first concrete harbour structure.
What the Photograph Shows:
On the beach (foreground and right):
- Workers mixing concrete in wooden troughs or on flat platforms
- Cement barrels — some intact (being used as seats), others broken open with staves scattered, indicating they were being opened on-site to provide cement for mixing
- Wheelbarrow and barrow run — narrow track made of planks with cross-bracing, used to transport mixed concrete from beach to reef
- Horse-drawn cart (dray) on far right — used to transport heavy cement barrels from town to beach
- Manual laborers and supervisors — workers actively engaged (movements blurred by long exposure), supervisors in suits and hats standing still
On the reef (background left):
- Large timber formwork structure built on the rocky reef — these are moulds lined with dark canvas, ready to receive concrete pours
- Basalt reef visible at low tide — the natural rock foundation where blocks were anchored
- Barrow run extending to formwork — showing the path workers used to wheel concrete to construction site
Offshore (background):
- Ships at anchor in the open roadstead — demonstrating the dangerous conditions that made the harbour works necessary
- Open sea conditions — emphasizing the exposed nature of Timaru's coastline
Historical Context:
This photograph provides rare visual documentation of pioneering concrete construction techniques in 1860s New Zealand. The 1:1:5 concrete mix visible being prepared consisted of:
- 1 part best Portland cement (imported from England, visible in wooden barrels)
- 1 part clean silicious sand
- 5 parts beach shingle (local aggregate)
The white dust and splash visible in the mixing area indicates active cement handling. The scene captures the moment when Portland cement concrete was being introduced to New Zealand marine engineering—a technology that would transform harbour construction across the country.
Attribution and Dating:
Photographer: Attributed to W. Ferrier (William Ferrier) based on "PROTECTED W FERRIER" inscription on original print.
Recorded: Circa December 1869 – March 1870, consistent with contemporary Timaru Herald descriptions of 1869 construction work.
Location: Timaru beach and reef, south of Strathallan Street landing place (Government Landing Service).
Source: Historical photograph collection. Original print shows signs of age-appropriate weathering and period photographic techniques (long exposure times causing motion blur of workers).
Note: While this photograph is consistent with all known details of Balfour's experimental breakwater construction and matches the December 1869 Timaru Herald description precisely, definitive archival confirmation of the date and subject would require verification through museum photographic records or photographer business records.
📷 Click to expand: The Photographer, the Copyright Owner, and a Family Connection to Tragedy
This photograph is marked "PROTECTED W FERRIER" but recent research reveals that William Ferrier was only 14 years old when this construction took place (December 1869 – March 1870), when his father David Ferrier, was directly involved in the SS Maori incident where James Melville Balfour drowned on December 19, 1869. This work would have to be attributed to another photographer whose images Ferrier acquired
Who Took This Photograph?
Not William Ferrier: William was only 14 years old in December 1869, making it highly unlikely he was the photographer. While teenage photographers existed in the Victorian era, the professional equipment, technical skill, and official access required to document a government engineering project make this improbable.
Most likely scenario: A local photographer based in Timaru or the wider Canterbury region was engaged to document the construction work. This could have been:
- A professional photographer commissioned by the Timaru and Gladstone Board of Works
- An itinerant photographer traveling through South Canterbury documenting significant projects
- A photographer working on speculation, knowing these government engineering works would have commercial value
- Someone connected to the maritime community who had access to the construction site
The original photographer's identity remains unknown and is a subject for further archival research. Checking Timaru Herald advertisements from 1869-70 and business directories might reveal photographers operating in the region during this period.
What Does "PROTECTED W FERRIER" Mean?
"PROTECTED" indicates copyright ownership, not authorship. This marking means William Ferrier held the legal rights to reproduce and sell prints from this negative, but it doesn't necessarily mean he took the photograph.
Victorian photographic business practices:
- Negatives were valuable assets that could be bought, sold, inherited, or transferred between photographers
- Copyright followed the negative — whoever owned the glass plate negative controlled reproduction rights
- "PROTECTED" stamps warned against unauthorized copying and asserted the owner's commercial rights
- Photographers routinely acquired negatives from other photographers' estates, studio closures, or business purchases
Conclusion: William Ferrier owned and protected the copyright to this historically significant photograph, but the original photographer was someone else — likely a professional working in Timaru during the construction period.
The David Ferrier Connection: A Witness to Tragedy
David Ferrier, William's father, was directly involved in the SS Maori incident of December 18-19, 1869 — the maritime tragedy in which Colonial Marine Engineer James Melville Balfour drowned.
The sequence of events:
- Morning, December 19: Balfour inspects his experimental breakwater construction, meets with the Board of Works, reports "the first block had been put down, and for an experiment it had been very successful"
- That afternoon: Balfour attempts to board the SS Maori anchored offshore to travel to his friend's funeral in Dunedin
- The tragedy: Eight passengers row out; they transfer to a lifeboat; a wave capsizes the boat
- David Ferrier's involvement: David Ferrier was present during this incident (exact role to be confirmed through further research)
- Two deaths: Balfour (38) and Alfred Beaumont Smallwood (23) drowned; six were rescued
Could James Melville Balfour Be in This Photograph?
It's entirely possible. The photograph shows multiple figures on the beach and reef — supervisors in suits and hats observing the work, as well as manual laborers actively engaged in concrete mixing and construction.
If this photograph was taken during December 1869, Balfour would have been regularly present at the construction site as the project's designer and the Colonial Marine Engineer overseeing the work. He made his final inspection on the morning of December 19, 1869, just hours before his death.
Who might be visible in the photograph:
- James Melville Balfour — as Colonial Marine Engineer, likely one of the suited supervisors observing the work
- Contractors Crawford and Green — the builders who won the tender and managed construction
- Inspector Keilly — the Board of Works inspector mentioned in contemporary reports
- Board of Works members — local officials monitoring progress
- Manual laborers — workers hired by the contractors to mix concrete, transport materials, and build the formwork
The poignant possibility: If Balfour is indeed one of the figures in this photograph, it would make this image even more significant — a visual record of the engineer inspecting his experimental project days or hours before his tragic death in the very surf conditions these harbour works aimed to tame.
Without additional documentation (such as photographer's notes, newspaper captions, or contemporary identifications), we cannot definitively identify specific individuals in the photograph. However, the presence of suited supervisors is consistent with Balfour's known involvement in overseeing this construction.
What Further Research Could Reveal
Priority archival investigations that could answer remaining questions:
- David Ferrier's precise role in the SS Maori incident:
- Search Timaru Herald December 20-31, 1869 for full list of participants
- Coroner's inquest records (if they survive)
- Was he one of the eight passengers? One of the six rescued? Ship's crew? Shore-based rescuer?
- Original photographer's identity:
- Search Timaru Herald advertisements 1869-70 for photographers
- Business directories listing photographers in South Canterbury
- Board of Works records — was photography commissioned officially?
- Compare print characteristics with known works by Canterbury photographers
- David Ferrier's occupation and Timaru connections:
- Electoral rolls, rate books, business directories 1865-1875
- Shipping records (was he maritime worker, merchant, ship's officer?)
- Death records and estate documents (when did William inherit?)
- William Ferrier's photography business establishment:
- First advertisements as professional photographer
- Business premises and timeline in Timaru
- Other photographs marked "PROTECTED W FERRIER" from this era
- Potential identification of figures in the photograph:
- Contemporary descriptions of Balfour's appearance
- Other photographs of Balfour (if any exist)
- Descriptions of contractors Crawford and Green
- High-resolution scan might reveal more detail
Recommended Attribution
For image caption (brief):
This photograph is more than technical documentation of engineering work — it represents a visual connection between a boy who became a photographer and his father who witnessed an engineer's death in the surf these harbour works were designed to tame.
Photographic Significance:
This image is historically valuable as it documents:
- The earliest known concrete harbour construction in South Canterbury
- Manual labor practices in 1860s New Zealand engineering projects
- The precarious nature of marine construction before modern equipment
- The open roadstead conditions that made Timaru's harbour development essential
- The scale of human effort required for even modest experimental structures
James Melville Balfour would have stood on this beach, observing similar scenes, just days before his death on December 19, 1869. The first concrete block referenced in his final words — "The first block had been put down, and for an experiment it had been very successful" — was likely cast using the exact methods visible in this photograph.
Visual Reconstructions: Imagining the Construction Process
⚠️ Important: These are AI-generated visualizations
The following images are modern artistic reconstructions created using artificial intelligence, based on historical research and contemporary descriptions from the Timaru Herald. They are NOT historical photographs but rather interpretations that help visualize what the construction process may have looked like. All historically accurate photographs will be clearly identified as such.
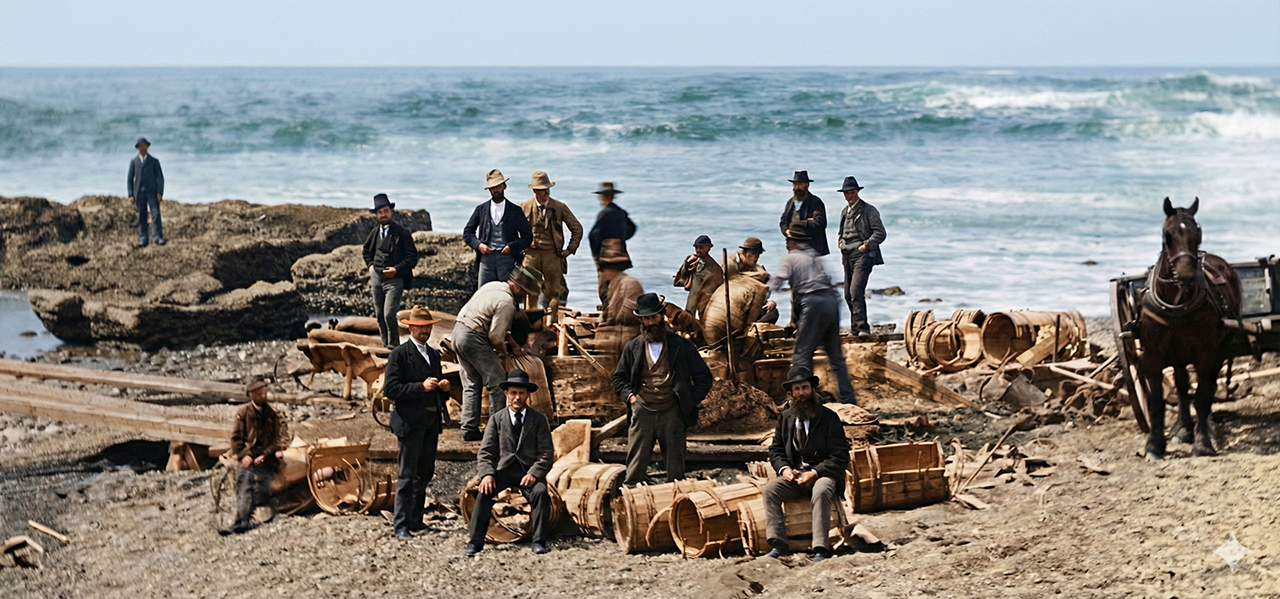
Visualization 1: Beach-Side Concrete Mixing and Material Handling
AI-generated artistic reconstruction created by Gemini AI based on historical descriptions.
What This Visualization Shows:
This reconstruction imagines the scene described in the Timaru Herald (December 4, 1869) when construction was in full swing:
Center of activity (beach):
- Workers in period clothing (1860s attire: suits, waistcoats, hats)
- Concrete mixing operation — wooden troughs and manual mixing
- Cement barrels — some intact, others broken open for use
- Supervisors observing — suited men overseeing the labor
- Manual laborers — some actively working, others resting
Background elements:
- Basalt reef with dark rock formations visible at low tide
- Heavy surf — emphasizing the challenging conditions
- Horse and cart — for transporting materials from town
- Open ocean — showing the exposed nature of the site
Historical Basis for This Visualization:
This scene is based on the Timaru Herald's December 4, 1869 report:
"The scene on the beach at an early hour on Thursday morning was one which it was quite cheering to behold, for to see life and activity there is really something novel in these dull times..."
The concrete mix shown (1:1:5 ratio) is accurate to the documented formula: one part Portland cement, one part sand, five parts beach shingle.
Technical Details:
- Source: AI-generated visualization (Gemini)
- Method: Created from textual descriptions and historical research
- Purpose: Educational visualization to help modern audiences understand the construction process
- Accuracy: Clothing, materials, and setting based on 1860s New Zealand working conditions; specific details are interpretive
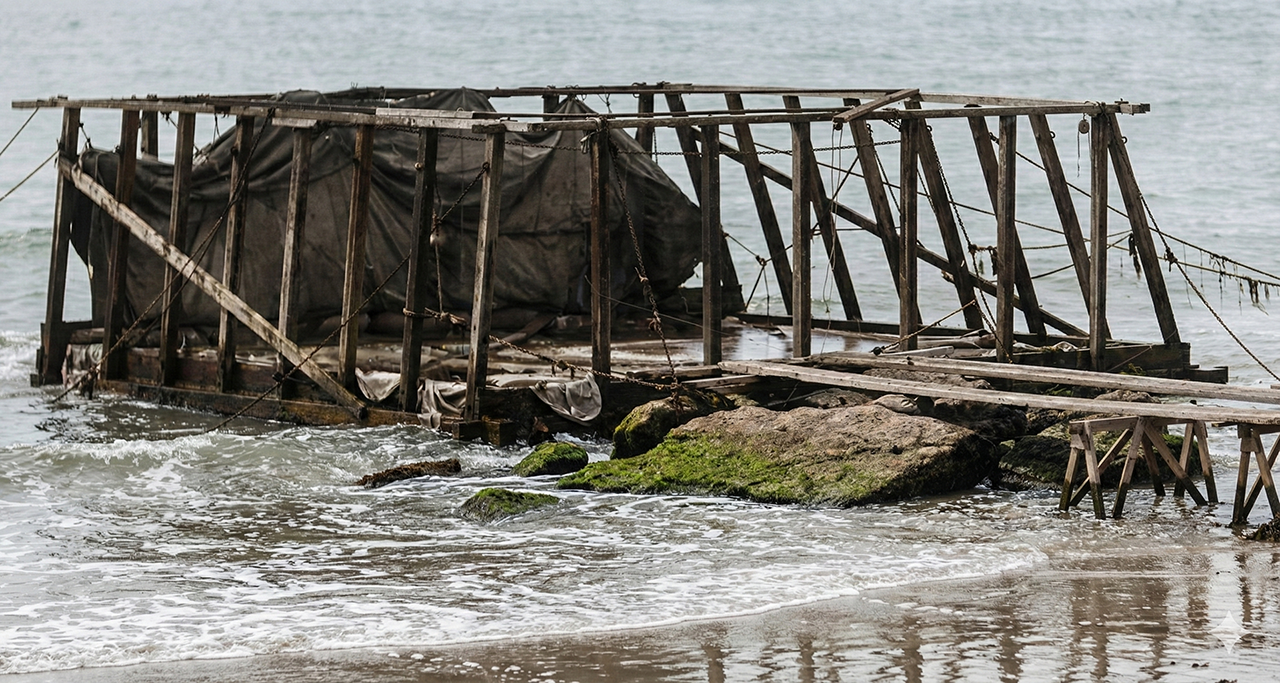
Visualization 2: Timber Formwork and Canvas-Lined Molds on the Reef
AI-generated artistic reconstruction created by Gemini AI based on historical descriptions and construction challenges.
What This Visualization Shows:
This reconstruction imagines the formwork structure described in contractor complaints and construction accounts:
Structural elements visible:
- Timber framework — diagonal bracing and support posts
- Canvas lining — dark fabric visible inside molds to contain wet concrete
- Deterioration and damage — showing the challenging conditions
- Chains and securing elements — illustrating the reinforced anchoring system developed after initial failures
Environmental conditions:
- Wave action — surf constantly threatening the structure
- Basalt reef — green growth on rocks indicating tidal zone
- Low tide exposure — showing when work could be done
- Weathering effects — illustrating the harsh marine environment
Historical Basis for This Visualization:
This image is based on contractor Crawford & Green's April 1870 complaints about construction difficulties:
- Original wooden/iron posts slipped from rock holes under wave pressure
- They had to develop iron "lewises" (expanding anchors) chiseled into the rock
- Additional chains were required to secure molds during concrete curing
- Fresh concrete was repeatedly washed away before these improvements
The deteriorated appearance shown here suggests either mid-construction challenges or the structure after months of wave damage (June 1870 onwards).
Comparing to Historical Photograph:
The historical photograph (shown above) captures formwork being prepared on the reef, with fresh timbers and canvas being positioned. This AI visualization shows formwork in a more weathered or damaged state, possibly representing:
- The structure after weeks/months of wave action
- Failed formwork after the incidents described by contractors
- The beginning stages of the deterioration that led to destruction (June-July 1870)
Technical Details:
- Source: AI-generated visualization (Gemini)
- Method: Created from descriptions of construction failures and environmental challenges
- Purpose: Illustrate the harsh conditions and structural challenges faced during construction
- Accuracy: Timber construction methods and marine weathering are period-appropriate; specific configuration is interpretive
Why Use AI-Generated Visualizations?
While these images are not historical photographs, they serve an important educational purpose:
- Bridge the imagination gap: Historical text descriptions can be difficult to visualize; these images help modern audiences understand what "concrete mixing on the beach" or "timber formwork on a reef" actually looked like in practice.
- Illustrate documented challenges: The weathered formwork visualization specifically helps explain the contractor complaints about posts slipping, concrete washing away, and the need for chains and lewises.
- Period-appropriate context: The clothing, equipment, and setting are based on research into 1860s New Zealand working conditions, helping viewers understand the era.
- Complement limited photographic record: Only one confirmed historical photograph of this work exists (shown above). AI visualizations can explore different angles and moments in the construction process.
- Provoke questions and engagement: Seeing these scenes helps visitors ask better questions: "How did they move the blocks?" "What happened when waves hit?" "Why was it so difficult?"
However, it's crucial to maintain clear distinctions:
- ✓ Historical photographs are primary sources — direct evidence from the period
- ✓ AI visualizations are educational tools — modern interpretations based on research
- ✓ Both have value, but they serve different purposes in historical understanding
Understanding Different Types of Visual Sources
| Type of Image | Historical Value | Limitations | Best Use |
|---|---|---|---|
| Historical Photograph (e.g., _0560.jpg by W. Ferrier) |
Primary source • Direct evidence from 1869-70 • Shows actual people, equipment, conditions • Cannot be fabricated or altered (in original form) |
• Limited to what photographer captured • May lack specific details • Single moment in time • Requires expert interpretation |
Research, authentication, proving historical facts, museum exhibits, scholarly publications |
| AI-Generated Visualization (Both Gemini images here) |
Educational tool • Helps visualize written descriptions • Can show multiple perspectives • Period-appropriate styling • Illustrates documented challenges |
• NOT primary evidence • Interpretive, not factual • May include anachronisms • Cannot prove historical details • Must be clearly labeled |
Public engagement, educational displays, illustrating concepts, generating interest and questions |
| Technical Drawings/Plans (Not available for this project) |
Primary source • Shows intended design • Precise measurements • Engineering specifications • Contemporary documentation |
• May not reflect as-built conditions • Requires technical expertise to read • Often incomplete • May not survive |
Technical research, reconstruction efforts, understanding design intent, academic analysis |
| Artist's Reconstruction (Traditional illustration) |
Educational tool • Expert interpretation of evidence • Can incorporate multiple sources • Typically more carefully vetted than AI • Artist accountability |
• Still interpretive • Artist's style influences result • Time-consuming/expensive to produce • May contain inaccuracies |
Museum displays, educational books, documentary films, historical interpretation |
A Note on Research Transparency
This article uses AI-generated visualizations alongside historical photographs to provide a more complete picture of Balfour's experimental breakwater. We've made these distinctions clear because:
- Historical integrity matters: Mixing primary sources with interpretations without clear labels undermines trust in historical work
- AI technology is powerful but imperfect: These tools can create compelling images, but they "imagine" rather than "document"
- Educational value requires context: Knowing how we know what we know is as important as the knowledge itself
- Future reference: As technology improves, clear documentation of sources becomes even more critical
When you visit museum displays or read historical accounts, always look for source attribution. Primary sources (documents, photographs, artifacts from the time period) provide evidence. Everything else—including AI visualizations, artist's renderings, and even written summaries—is interpretation based on that evidence.
Executive Summary
Between November 1869 and March 1870, contractors Crawford and Green constructed a small experimental concrete breakwater on the basalt reef south of Timaru's Strathallan Street landing place. This structure—variously described in contemporary sources as a "groyne," "breakwater," "mole," or "experimental harbour works"—was designed by Colonial Marine Engineer James Melville Balfour to test both the performance of Portland cement concrete in open surf and the behavior of Timaru's relentless northward-drifting shingle.
The structure was completed three months after Balfour drowned at Timaru on December 19, 1869, while attempting to board the SS Maori to attend his friend's funeral. Though Balfour pronounced the first block placement "very successful" on the morning of his death, the completed structure survived only months. By June 1870 it was suffering attrition damage from grinding shingle, and by mid-to-late 1870 a storm had "carried it away entirely," proving both the power of Timaru's coastal forces and the critical importance of understanding shingle dynamics in harbour design.
Key Facts:
- Designer: James Melville Balfour, Colonial Marine Engineer
- Construction period: November 1869 – March 24, 1870
- Location: Basalt reef south of Strathallan Street landing place
- Dimensions: Approximately 60-80 feet long, 7 feet high (only 1 foot above high water)
- Material: Portland cement concrete (1:1:5 mix ratio)
- Cost: £1,000–£1,350
- Fate: Destroyed by storm mid-to-late 1870
Part I: Background Context and Balfour's Role
1.1 The Timaru Problem (1860s)
Timaru in the 1860s was an "open roadstead"—ships anchored offshore with no natural harbor protection, and all passengers and cargo transferred through surfboats in often dangerous conditions. Between 1865 and 1890, 28 ships were wrecked at Timaru, earning it a reputation as a ship graveyard with correspondingly high insurance premiums.
The coast presented a unique engineering challenge: a 90-mile shingle beach with powerful southerly swells driving beach material northward at extraordinary rates. Any structure that interfered with this "shingle conveyor belt" risked catastrophic consequences—accumulation to the south, erosion to the north, or both.
1.2 James Melville Balfour: The Engineer
James Melville Balfour (born June 2, 1831, Edinburgh; died December 19, 1869, Timaru) was a Scottish-trained marine engineer who arrived in New Zealand aboard the Sir Ralph Abercromby on September 14, 1863.
Career highlights:
- Trained under the renowned Stevenson family of lighthouse engineers in Edinburgh
- Brother-in-law to Thomas Stevenson (father of author Robert Louis Stevenson)
- Initially employed by Otago Provincial Council as Marine Engineer (1863)
- Appointed Colonial Marine Engineer by the New Zealand Government (October 1866)
- Described by contemporary Frederick Furkert as "a far-seeing man of boundless energy and sound judgement"
Sources: Otago Witness obituary (25 December 1869); Engineering magazine joint obituary (25 February 1870); Marine Department Report AJHR 1871.
The Scientific Approach: Balfour's 1865 Survey
Four years before building his experimental breakwater, Balfour conducted a comprehensive scientific survey of Timaru's roadstead. These original documents reveal the meticulous research that shaped his experiment.
📜 Historical Documents from October 1865
The following images are scans of Balfour's original survey report and planning map submitted to the Otago Provincial Government in October 1865. These are primary historical sources showing his scientific methodology.
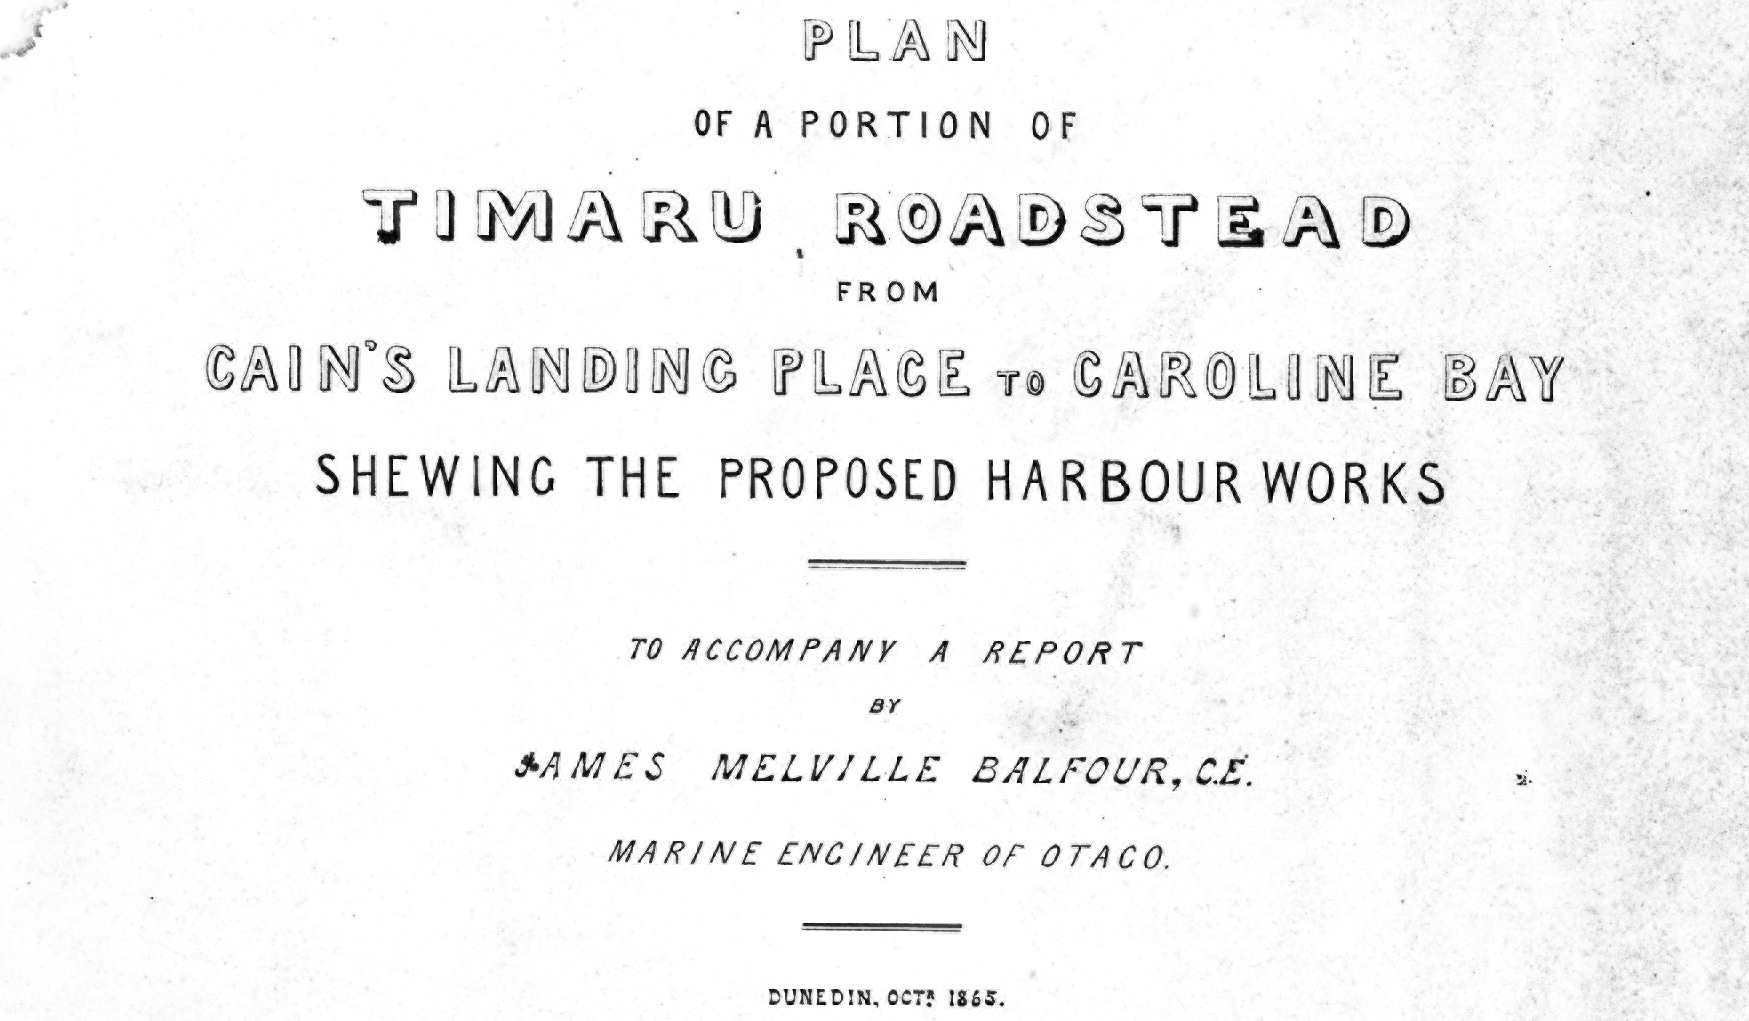
"Plan of a Portion of Timaru Roadstead from Cain's Landing Place to Caroline Bay, Shewing the Proposed Harbour Works to accompany a Report by James Melville Balfour, C.E., Marine Engineer of Otago. Dunedin, Octr 1865."
Note his title: "Marine Engineer of Otago" — this was before he became Colonial Marine Engineer in 1866.
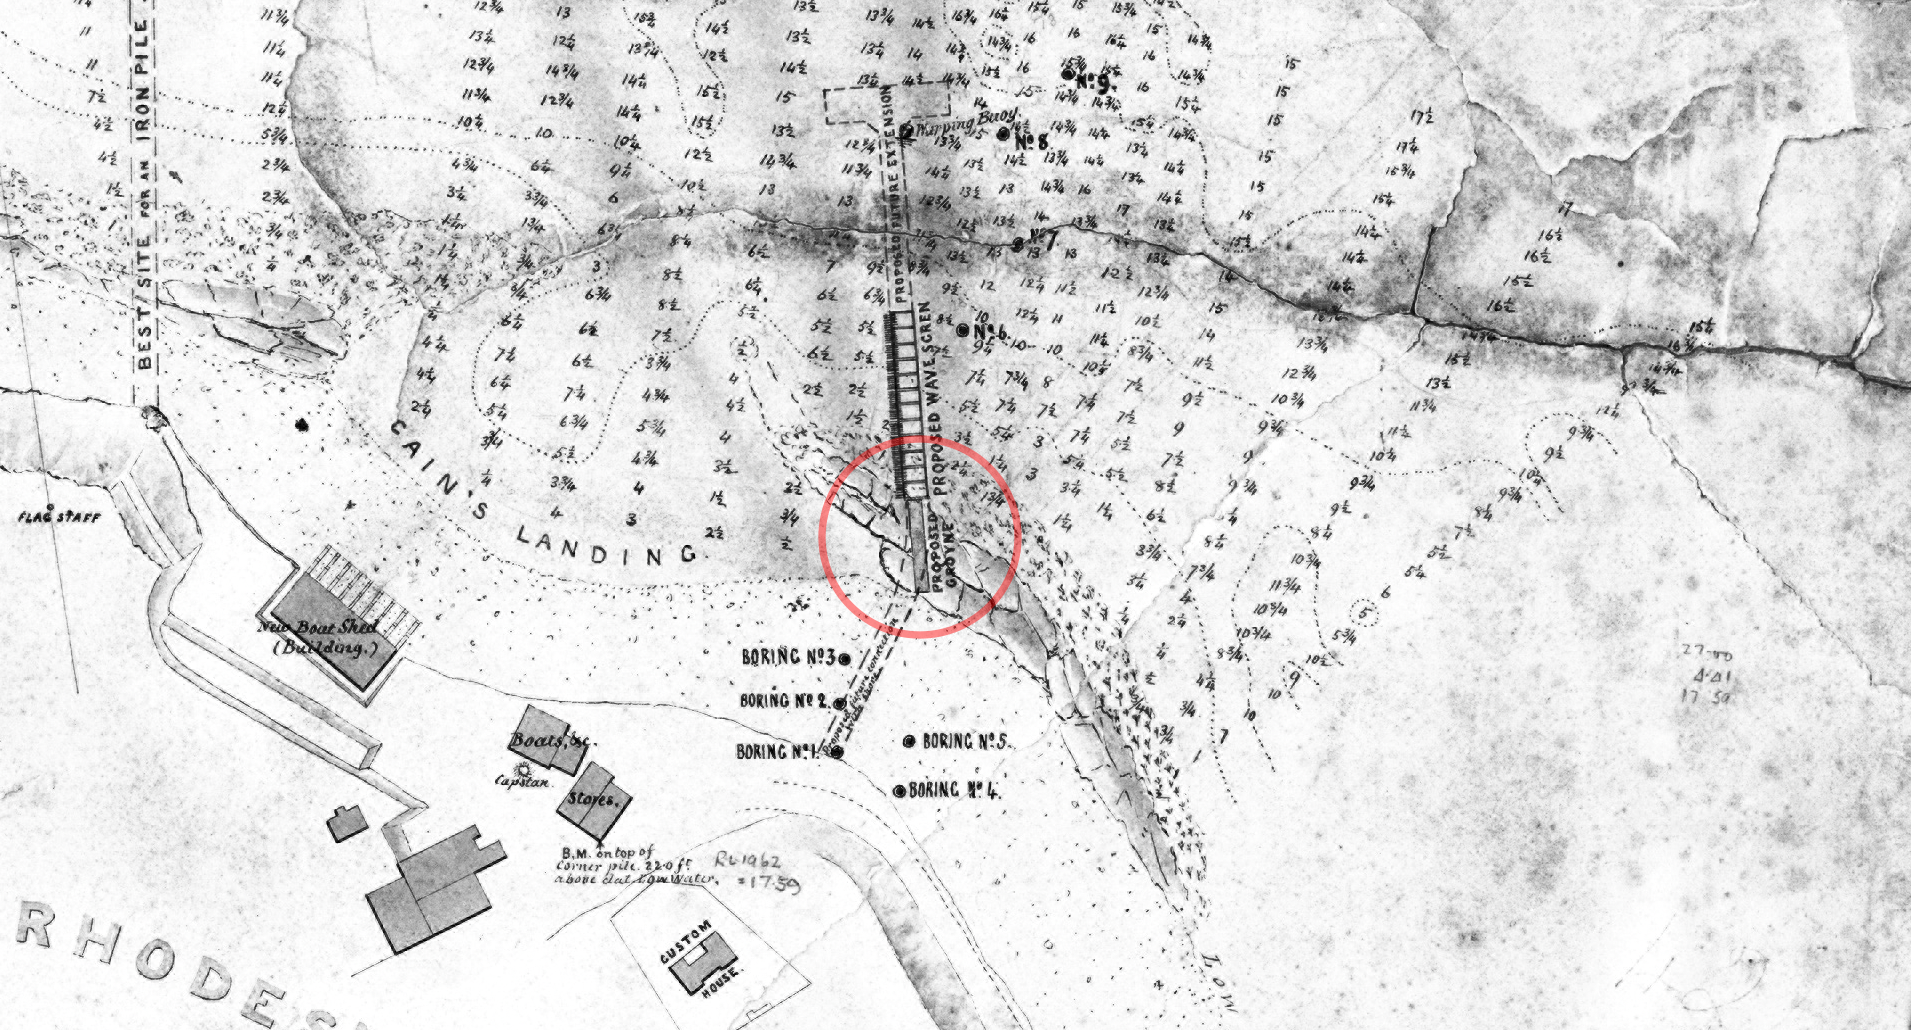
What This Map Shows:
- Red circle: The reef area where Balfour proposed building his experimental structure (this is where the 1869-70 breakwater was later constructed)
- Boring locations No. 1-5: Where Balfour drilled test holes into the seabed to determine bottom composition and rock depth
- Depth soundings: Numbers across the entire map showing water depths at low tide — critical data for understanding wave behavior and construction challenges
- Cain's Landing Place: The existing landing site (labeled on map) — the dangerous spot where passengers and cargo transferred from ships through surfboats
- Shore buildings: New Boat Shed, boarding houses, Captain Cain's property — showing the maritime infrastructure already established
- Reef configuration: The dotted patterns show shallow water and exposed rock — this basalt reef became Balfour's construction platform
This map documents the site four years before construction began. Balfour's systematic survey provided the foundation for his experimental design.

This document reveals Balfour's scientific methodology in detail:
NOTES Section:
- Soundings in feet at low water of a spring tide rising 7 feet
- Color coding: Red soundings = rock bottom, Black soundings = sandy bottom
- Blue ridges: Show "the manner in which the prevailing Swell travels or 'Cains Landing'" — visualizing wave patterns
- In Caroline Bay: "no particular attention was paid to the nature of the bottom" (his focus was on the landing area)
BORINGS (Test Holes 1-9):
Balfour drilled nine test holes to determine what lay beneath the surface:
- No. 1: 4 ft 2 in shingle, 6 ft 1 in stiff blue clay (total depth 10 ft 9 in)
- No. 2: 6 ft 8 in shingle to rock
- No. 3-5: Varying depths of shingle to rock (4-9 feet)
- No. 6-7: Attempted borings using cast iron screw — difficult conditions, limited success
- No. 8: Rock bottom — screw could not penetrate
- No. 9: 2 ft 4 in sand, then hard rock
These borings revealed that solid basalt reef lay beneath a relatively thin layer of mobile shingle — critical information for construction planning.
EXPERIMENTS Section — The Key Discovery:
Experiment 1: Tracking Shingle Movement
"To investigate the travel of the Shingle, 12 wood bricks loaded to a Specific Gravity of from 140lb to 149lb were thrown into the sea at Patiti Point, upwards of a mile to the southward of Cains Landing."
- Timeline: Thrown in on November 19, 1864 (written as "11/9b to 1/19b" in old notation)
- Results: Four were picked up the next day, one four days later, two seven days after
- Final three: Located south of the reef on January 19, 1865
- Conclusion: During the whole seven days, "the swell was very slight" — yet the blocks still traveled approximately one mile in seven days
Experiment 2: Testing if Shingle Moves Over Flat Rocks
"To ascertain whether the Shingle was drawn out over the flat Rocks by the receding waves, two holes 1 ft diameter & 8 inches deep were cut in the reef & were frequently examined at low water — they were always free of shingle."
"Two holes 14 inch diameter & 11½ deep were also drilled in the rock & similarly examined; the one near the landward edge of the reef always contained shingle, the other was as invariably empty."
Discovery: Shingle doesn't get pulled back over flat rock by receding waves — it moves along the beach surface, accumulating at certain points.
Experiment 3: Testing Rock Holding Power
"To test the holding power of the rock: an iron bar 1¾ inch square tapering to ¾ inch square was driven 11 inches into a hole 1¾ inches diameter. In attempting to draw it out again a force equal to two tons was exerted through levers without starting it in the least."
Conclusion: The basalt reef was strong enough to anchor heavy structures — this directly informed his later use of iron "lewises" to hold formwork during concrete construction.
Why This Matters: Science Before Construction
These 1865 documents reveal that Balfour's 1869-70 experimental breakwater wasn't a guess — it was the culmination of four years of systematic scientific investigation:
- ✓ He measured shingle movement rates precisely (lead-weighted blocks)
- ✓ He understood bottom composition (9 borings)
- ✓ He tested rock holding power (iron bar experiment)
- ✓ He mapped wave patterns and depth soundings comprehensively
- ✓ He experimented with how shingle behaves over different surfaces
When he finally built the concrete structure in 1869, he knew exactly what he was testing and why. The experimental breakwater was the next logical step in a carefully planned research program.
From Survey to Experiment: The Four-Year Journey
The experimental breakwater of 1869-70 was built on a foundation of rigorous scientific research. Balfour didn't just build and hope — he measured, tested, and planned.
Part II: Design Evolution and Specifications
2.1 Original Proposal: Stone Water-groyne (1866–1867)
Balfour's initial recommendations appeared in the Timaru Herald in 1866–1867, based on his surveys for the Canterbury Provincial Government:
From Timaru Herald, September 5, 1866:
- A "stone water-groyne or small breakwater"
- About 80 feet long
- Placed "a little to the south of the new boat-shed"
- Extending across the reef as far as dry at low water
- Rising only one foot above high-water level
Key design principle: The deliberately LOW profile (only 1 foot above high water) meant waves would still wash over the structure, but with reduced force. This was not meant to be a full wave barrier but rather a partial obstruction that would allow observation of shingle behavior without completely blocking natural processes.
2.2 Material Revolution: The Shift to Concrete (1868)
By 1868, Balfour had reconsidered the construction material. Portland cement—a revolutionary hydraulic cement developed in England in the 1820s—was becoming available in New Zealand and offered significant advantages over stone construction.
"If he recommended thin work now, he should not advise the Board to build it of stone, but of concrete, made either with Portland cement or hydraulic lime, as it would be much cheaper, 'and no power of the sea could remove the blocks.'"
— Timaru Herald, April 25, 1868
Irony: Balfour's confident statement that "no power of the sea could remove the blocks" would prove tragically incorrect, though this was more due to the structure's modest scale and the overwhelming force of Timaru's coastal dynamics than to any fundamental flaw in concrete as a material.
2.3 Explicit Experimental Purpose (Late 1868)
From Timaru Herald, December 2, 1868 (Board of Works meeting):
The Chairman explained why they should proceed with Balfour's suggested work:
"He (the Chairman) thought that if the work, when carried out, would place Mr Balfour in a position to say what action the shingle would have upon any larger work, it should be done."
This makes crystal clear that:
- The structure was explicitly experimental
- Its purpose was to reveal "what action the shingle would have"
- It was small compared to any future harbour scheme
- It was designed to generate data, not to be permanent infrastructure
2.4 As-Built Specifications (December 1869)
The most detailed contemporary technical information comes from the Timaru Herald's December 4, 1869 article, "THE TIMARU HARBOUR WORKS."
Concrete Mix Proportions:
"The concrete was composed of one part of the best Portland cement, one part of clean silicious sand, and five parts of shingle from the beach."
Mix Analysis:
- Ratio: 1:1:5 (cement:sand:aggregate)
- For the 1860s, this was a relatively rich, strong mix
- Use of beach shingle as aggregate was economical and appropriate
- "Clean silicious sand" suggests careful material selection
Construction Method:
- Materials mixed on a timber platform or trough on the beach
- Turned repeatedly until "thoroughly mixed"
- Placed in forms/molds
- The article describes "active building on the beach" with "life and activity"
Balfour's Final Words
"The late Mr Balfour, on the morning of his melancholy death, at an interview with the Board of Works, said:— 'The first block had been put down, and for an experiment it had been very successful.'"
— Timaru Herald, March 26, 1870
This confirms:
- Concrete was cast into discrete blocks (not poured in continuous mass)
- At least one block was successfully placed by December 19, 1869
- Balfour himself considered the experiment promising
2.5 Dimensions: Reconciling the Sources
| Source | Length Given | Date/Context | Interpretation |
|---|---|---|---|
| Timaru Herald (Jan 1867) | 80 feet | Original proposal | Planned length |
| Timaru Herald (1914 retrospective) | 60 feet | Looking back | As-built length |
| Various AI summaries | 87 feet | From tenders? | Possibly tender specifications |
| Various AI summaries | 30 yards (90 feet) | Secondary sources | Possibly confusion with reef length |
Most likely scenario: The original proposal was for 80 feet, but the as-built structure ended up somewhat shorter—probably 60-80 feet—due to construction difficulties and budget constraints.
Part III: Construction Challenges and Contractor Disputes
3.1 Project Timeline
| Date | Event |
|---|---|
| November 1869 | Tenders called under Balfour's specifications |
| Late Nov/Early Dec 1869 | Contract awarded to Messrs Crawford and Green |
| December 19, 1869 | Balfour drowns; first block successfully placed |
| Dec 1869 – Mar 1870 | Construction continues posthumously |
| March 24, 1870 | Work completed |
3.2 Construction Method (Reconstructed from Contractor Complaints)
The most detailed information about HOW the blocks were constructed comes from Crawford and Green's April 7, 1870 letter requesting extra compensation, reported in Timaru Herald April 9 and 23, 1870.
The basic method per Balfour's specifications:
- Prepare the reef: At low tide, "jump" (drill or chisel) holes into the solid basalt reef
- Install anchoring posts: Insert wooden or iron posts into these holes
- Set up formwork: Position timber forms/molds around these posts
- Pour concrete: Mix and pour concrete into the molds at low tide
- Allow to cure: Let concrete harden before the next high tide
- Build in tiers: Once bottom blocks set, repeat for upper courses
The problems that arose:
First bottom-tier block failure (£50 loss):
- The corner block's mold rose when concrete was poured
- Wooden/iron posts slipped from their rock holes under wave pressure
- The fresh concrete was washed away before it could set
- Solution: Iron posts shaped as "lewises" (expanding gripping anchors)
Upper-tier block failure (£50 loss):
- Even with lewises, fresh concrete in upper tier washed away
- Solution: Additional lewises and chains secured molds to rock
Total cost overrun: Contractors requested £200 extra beyond contract sum (contract was around £1,150); they claimed total outlay of £1,350 excluding supervision.
3.3 The Contractor Compensation Dispute
Arguments against extra payment:
- Mr. Healey and Mr. Perring: "dangerous precedent"
- Contractors bore the risk; Balfour only "suggested" methods
- A lower tender had been available
Arguments for extra payment:
- Mr. Hall and Dr. Fisher: Praised Captain Crawford's competence
- The fastenings specified proved inadequate
- Balfour had promised to recommend extra compensation
Resolution: Motion to refuse was amended to postpone for more information. £50 paid separately to inspector Mr. Keilly. No final resolution on the £200 is reported in available sources.
Part IV: The Short Life and Rapid Failure
4.1 Balfour's Last Day and Death (December 19, 1869)
The Double Tragedy
December 15, 1869: Thomas Paterson, Engineer of Roads and Railways to the Otago Government and Balfour's close friend since Edinburgh, drowned when the Oamaru coach overturned while fording the flooded Kakanui River.
December 18-19, 1869: Balfour was at Timaru inspecting his experimental breakwater project. He attempted to board the SS Maori anchored offshore to travel to Paterson's funeral in Dunedin.
The accident sequence:
- Eight passengers rowed out in a whaleboat through heavy seas
- The whaleboat got into difficulties
- Passengers transferred to a lifeboat sent from the Maori
- As the lifeboat drew alongside the ship, a large wave struck it
- The lifeboat capsized, throwing everyone into the water
Two passengers drowned:
- James Melville Balfour, age 38, Colonial Marine Engineer
- Alfred Beaumont Smallwood, age 23, bank teller
Six passengers were rescued (names not identified in available sources).
The poignant irony: Balfour drowned in the very surf conditions his experimental breakwater was designed to study and mitigate. He died attempting to reach the funeral of a friend who had also drowned just three days earlier. Both Edinburgh-trained engineers who arrived in New Zealand together in 1863 were buried alongside each other.
4.2 Initial Performance and Early Damage (January–June 1870)
From Timaru Herald, January 19, 1870:
"Timaru Breakwater.—Another block of this work was laid on Monday. When uncovered, it was found the top was slightly injured by the water, a portion of it being washed off. This is really not the slightest injury to the work, as in fact the rougher the under block is on its upper surface the greater key will it afford to the upper tier of blocks when put down."
From Construction to Destruction: The Complete Story in Six Scenes
⚠️ AI-Generated Visualization Sequence — The following images are modern artistic reconstructions created using artificial intelligence to help visualize the construction and destruction process. They are NOT historical photographs but educational tools based on contemporary descriptions from the Timaru Herald and engineering reports.
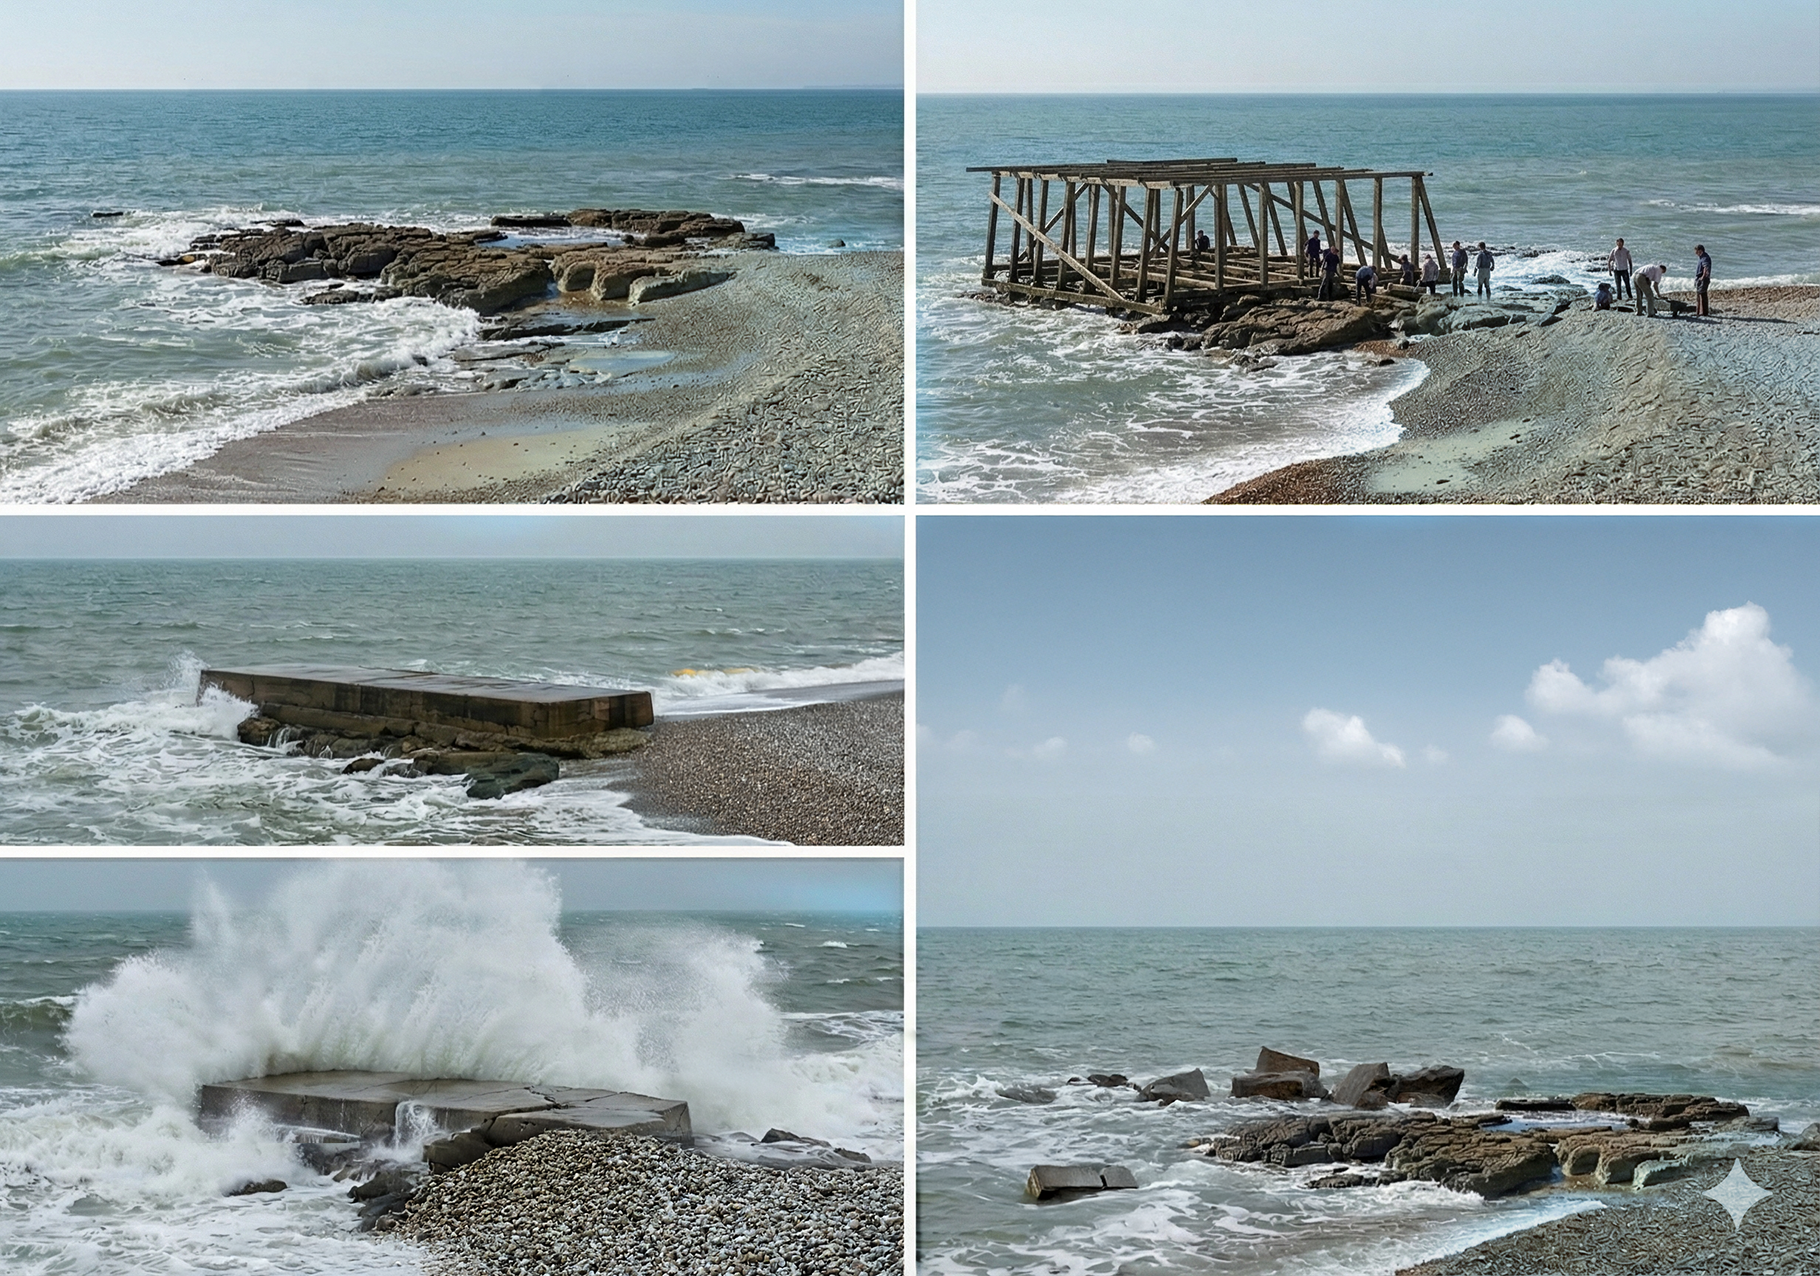
Read this sequence left-to-right, top-to-bottom:
1. The Challenge (Before Construction)
Top left: The basalt reef at low tide. This is what Balfour faced—raw black rock exposed by receding water, constantly battered by surf. Notice the wave action and exposed reef formations. This was his construction site, accessible only during brief low tide windows.
2. Construction Phase (December 1869 – March 1870)
Top right: Timber formwork erected on the reef with workers visible. This shows the canvas-lined wooden molds anchored with iron "lewises" drilled into the basalt. Workers had to complete each section before the tide returned. The diagonal bracing resisted wave forces while concrete cured.
3. Completed Structure (March 1870)
Middle left: The finished concrete breakwater in place. Notice how LOW it sits—only about 1 foot above high water. This was deliberate. Balfour wanted waves to wash over it so he could study shingle accumulation patterns. The structure extends seaward from the reef.
4. The Forces at Work (June 1870 onwards)
Middle right: Calm sea and sky—but beneath this tranquil surface, powerful forces were at work. Even in seemingly calm conditions, the "shingle conveyor belt" moved thousands of tons of beach material northward at up to one mile per day. The breakwater blocked this movement.
5. Wave Impact and Deterioration (Mid-1870)
Bottom left: Heavy wave impact on the concrete structure. This shows what the Timaru Herald (June 8, 1870) described: "a small piece of concrete was broken off the seaward side" by the grinding action of shingle. Each wave brought tons of stones that slowly abraded the concrete like sandpaper against wood.
6. Destruction Complete (Late 1870)
Bottom right: Concrete blocks broken and scattered across the reef. This is what engineer John Blackett found in his 1880 survey: the sea had "carried away the groyne entirely." The experiment was over. The blocks that Balfour watched being placed on December 19, 1869—his final day—now lay broken in the surf.
What This Sequence Reveals About the Experiment
The complete lifecycle took less than one year:
- December 1869: First block placed (Balfour dies the same day)
- March 1870: Construction completed (3 months)
- June 1870: First damage observed (3 months standing)
- Mid-Late 1870: Destroyed by storm (total lifespan: ~6 months)
Three key lessons visible in this sequence:
- Scale matters: The modest size that made the experiment affordable also made it vulnerable
- Shingle is unstoppable: The grinding action of moving stones defeated the concrete
- Location blocking has consequences: Stopping the natural shingle drift created severe effects both up and down coast
Technical Note: These AI-generated images help visualize processes described in historical documents but should not be taken as accurate representations of specific details. The actual blocks' size, exact positioning, and deterioration pattern are inferred from written descriptions rather than photographic evidence. The one confirmed historical photograph (shown earlier) provides the most reliable visual record.
AI-generated visualization sequence created by Gemini based on contemporary historical descriptions from the Timaru Herald (1869-1870) and engineering reports. For educational purposes only.
This visual sequence captures what took nearly a year to unfold in 1869-70. From Balfour's ambitious experiment to scattered concrete blocks on a storm-swept reef, the breakwater's brief existence generated the empirical data that made Timaru's eventual successful harbour possible.
The irony: The structure survived barely longer than Balfour himself—both claimed by the same forces they sought to understand and overcome.
March 26, 1870: Work successfully completed on Thursday (March 24).
From Timaru Herald, June 8, 1870 (first damage report):
"The late heavy seas have done a little damage to the breakwater. Yesterday morning a small piece of concrete was broken off the seaward side of the breakwater, and deposited on the top, where it remained for some few minutes, till a heavy sea came and carried it a good many yards on to the beach. The lower portion of the breakwater remains uninjured. The damage to the top has been caused by the attrition of the shingle."
Key observations:
- By June (just 2.5 months after completion), damage was already occurring
- Attrition from grinding shingle was the mechanism of failure
- The BASE held firm (validating the rock-anchored design)
- The UPPER portion was vulnerable—exactly what Balfour's experiments aimed to study
4.3 Progressive Effects and Ultimate Destruction (Mid-Late 1870)
No specific storm is named in 1870 Timaru Herald coverage for the breakwater's destruction, but the effects and ultimate fate are described in retrospective accounts.
From John Blackett (Colonial Marine Engineer), 1880 report:
"…exactly the same thing occurred on two previous occasions when an obstruction to the passage of the shingle took place at the site of the breakwater. One occasion was on the erection of an experimental concrete groyne by the late Mr. Balfour, and the other the wreck of the 'Princess Alice.' The groyne and the wreck stopped the passage of fresh shingle from the south, and so allowed the sea to denude the shore on the northern side of the obstruction. Serious damage was done to the landing service on both occasions. Relief came in the first instance by the sea carrying away the groyne in a storm…"— AJHR 1880-I, Appendix, p. 1025
What happened:
- Shingle accumulation (south side): The groyne blocked northward shingle drift, causing thousands of tons to pile up and surge over the low wall
- Northern erosion: North of the groyne, the beach was "denuded"—starved of fresh shingle
- Damage to infrastructure: The landing place and boat sheds suffered "serious damage"
- Storm destruction: A storm (likely July-August 1870) "carried away" the entire structure
- Natural restoration: Once the groyne was gone, natural conditions returned
4.4 Destruction Timeline Summary
| Date | Event |
|---|---|
| March 24, 1870 | Breakwater completed |
| June 8, 1870 | First damage: shingle attrition breaking concrete |
| June 20-21, 1870 | Aurora stranding; breakwater provides lee for salvage |
| Mid-late 1870 | Massive shingle accumulation south, severe northern erosion |
| Mid-late 1870 | Storm destroys entire structure |
| By early 1871 | Groyne treated as already gone in funding debates |
The failure was complete but VALUABLE: It confirmed Balfour's hypothesis about rapid, unstoppable shingle travel and demonstrated the necessity for massive, robust protections rather than experimental structures.
Part V: Legacy and Historical Significance
5.1 What the Experiment Proved (Unintended Consequences)
Balfour's experimental breakwater failed as a permanent structure but succeeded as a scientific experiment. It provided clear empirical evidence that:
1. Portland cement concrete was viable
The blocks themselves withstood wave forces. Failure was due to scale and coastal dynamics, not material deficiency.
2. Shingle drift was extraordinarily powerful
One mile per day movement confirmed. Grinding attrition could destroy concrete.
3. Blocking shingle had severe consequences
Southern accumulation, northern erosion—effects would recur with permanent breakwater.
4. Timaru required massive infrastructure
Light structures were insufficient. Full-scale breakwaters extending into deep water were necessary.
5.2 Engineering Lessons Incorporated into Later Work
When the Timaru Harbour Board finally constructed the permanent breakwater starting in 1878 (designed by John Goodall, following Sir John Coode's 1875 plans), they used the SAME basic technology but at vastly different scale:
| Aspect | Balfour's Experiment (1869-70) | Permanent Breakwater (1878+) |
|---|---|---|
| Material | Portland cement concrete | Portland cement concrete ✓ |
| Method | Precast blocks placed on reef | Precast blocks placed on seabed ✓ |
| Block size | Unknown (modest) | 30+ tons |
| Length | 60-80 feet | 700+ meters into deep water |
5.3 The Oamaru Confusion: Clarifying a Common Error
⚠️ Common Historical Error to Avoid
Many secondary sources conflate Balfour's work at Timaru with a DIFFERENT structure at Oamaru. This must be corrected:
| Aspect | OAMARU (Different Port) | TIMARU (This Article) |
|---|---|---|
| Structure type | Screw-pile jetty (open construction) | Concrete groyne (solid blocks) |
| Cost | £14,000 | £1,000–£1,350 |
| Destruction | Great Storm Feb 3-4, 1868 | Storm mid-late 1870 |
| Balfour's role | Reported on it; locals chose design | Designed it; advocated for concrete |
Key point: The destruction of the Oamaru screw pile jetty in 1868 reinforced Balfour's belief that only solid, massive concrete structures could withstand Canterbury's exposed coast. His Timaru experiment tested this principle at modest scale.
5.4 Historical Memory and Commemoration
Balfour's work is remembered in several contexts:
1. Engineering history
- Recognized as pioneering scientific approach to coastal engineering in New Zealand
- His shingle-drift research cited in multiple subsequent harbour engineering reports
- Experimental method (controlled observation) was ahead of its time
2. Tragedy
- Death scene became part of Timaru maritime lore
- Buried in family vault at Colinton Churchyard, Edinburgh
- Jointly commemorated with Thomas Paterson in Engineering magazine obituary
3. Harbour development
- His work directly influenced the successful permanent harbour (1878–1906)
- His predictions about shingle behavior proved accurate
- His advocacy for concrete construction vindicated
4. Contemporary recognition
"[Balfour] was a far-seeing man of boundless energy and sound judgement whom the young colony could ill afford to lose"
— Frederick Furkert, later Engineer-in-Chief of Public Works Department
Part VI: Synthesis and Reconciliation of Sources
6.1 What We Know with Confidence (Primary Source Evidence)
✓ From contemporary Timaru Herald reports (1866–1870):
- Balfour proposed harbour work in 1866-67, initially specifying stone
- By 1868 he advocated concrete as superior and more economical
- Structure explicitly experimental, designed to study shingle behavior
- Construction began late 1869, first block placed by December 19, 1869
- Balfour called it "very successful" on morning he died
- Work completed March 24, 1870
- Concrete mix: 1:1:5 Portland cement:sand:beach shingle
- By June 1870, shingle attrition was damaging upper portion
~ Probable but not absolutely certain:
- Length approximately 60-80 feet (sources vary)
- Destruction likely July-August 1870 (exact date unknown)
- Blocks cast on beach, cured, then placed at low tide
- Cost approximately £1,000-£1,350 total
✗ Definitively incorrect (common errors to avoid):
- There was NO screw pile jetty at Timaru (that was Oamaru)
- NOT destroyed in 1868 storm (that was Oamaru jetty)
- NOT made of stone (that was early proposal only)
- NOT multiple experimental structures (just one)
- Balfour did NOT die on December 18 (December 19, 1869 correct)
6.2 Areas of Uncertainty and Speculation
Questions requiring archival research:
- Exact length: 60 ft? 80 ft? 87 ft?
- Precise size/weight of individual blocks
- Exact date of storm destruction
- Resolution of Crawford & Green's £200 claim
- Names of six rescued passengers (December 19 drowning)
- Full text of Balfour's October 1864 surfboat shelter report
Part VII: Conclusions
7.1 Why This Structure Matters
Balfour's experimental breakwater was a pioneering failure—it failed as permanent infrastructure but succeeded as scientific research. Its significance lies in:
- Engineering innovation: First significant use of Portland cement concrete for marine construction in South Canterbury
- Scientific methodology: Systematic data collection, controlled experimentation, acceptance that failure generates valuable data
- Historical legacy: Direct predecessor to successful permanent harbour (1878–1906)
- Human tragedy: Balfour's death while inspecting this work adds poignant dimension
7.2 Connecting to the Alexandra Lifeboat Story
For museum exhibitions, this experimental breakwater connects to the Alexandra lifeboat (and the May 14, 1882 "Black Sunday" disaster) in several ways:
1. Chronological context
Balfour's work (1869-70) preceded the Alexandra's deployment by 5-6 years. Both respond to the same fundamental problem: Timaru's dangerous open roadstead.
2. Shared coastal challenges
The same shingle-driven surf that destroyed Balfour's breakwater threatened lifeboats. The same northward current affected both harbour engineering and rescue operations.
3. Engineering vs. rescue
Balfour's approach: modify the environment (build breakwater). Alexandra's approach: improve emergency response (provide capable lifeboat). Both strategies were necessary.
4. Timeline of solutions
- 1869-70: Balfour's experimental breakwater (failure reveals scale of problem)
- 1874-76: Alexandra lifeboat arrives and proves essential
- 1878-1906: Permanent breakwater constructed
7.3 Final Assessment
James Melville Balfour's experimental concrete breakwater at Timaru was short-lived but long-remembered. Completed in March 1870 at a cost of £1,000-£1,350, it survived only 3-6 months before being "carried away in a storm." Yet its legacy endured:
- It proved concrete technology could work in marine environments
- It confirmed the extraordinary power of Timaru's coastal forces
- It demonstrated the critical importance of understanding sediment transport
- It provided data that directly informed successful harbour construction a decade later
Balfour did not live to see his experiment's completion, drowning on December 19, 1869 in the very surf conditions his breakwater aimed to tame. But his scientific approach—building to learn, accepting failure as data, using modest experiments to inform major projects—established a methodology that would ultimately transform Timaru from a dangerous roadstead into a functioning artificial harbour.
The experimental breakwater's destruction was not an ending but a beginning—it marked the end of speculation and the beginning of empirical understanding.
Key Primary Sources
Contemporary Newspaper Reports
- Timaru Herald, September 5, 1866 (Balfour's stone groyne proposal)
- Timaru Herald, January 9, 1867 (full report extract)
- Timaru Herald, April 25, 1868 (shift to concrete)
- Timaru Herald, December 4, 1869 (construction description, concrete mix)
- Timaru Herald, March 26, 1870 (completion and Balfour's final words)
- Timaru Herald, June 8, 1870 (first damage report)
Official Reports
- AJHR 1871-I.2.2.4.10 (Marine Department report)
- AJHR 1880-I.2.1.6.2 (John Blackett report on harbour erosion)
Retrospective Accounts
- Timaru Herald, June 11, 1914 (50th anniversary retrospective)
- Oliver A. Gillespie, South Canterbury: A Record of Settlement (1958)